
You step outside after a Utah storm, look up at the eaves, and see a row of thick icicles hanging over the driveway. It looks seasonal until you notice one section is worse than the rest, the gutter edge is buried in ice, and there's a faint water stain starting on the ceiling inside.
That's the point where most homeowners get bad advice. People blame the shingles, the gutters, or the weather. Those matter, but the usual ice dam prevention roof problem starts somewhere less obvious. It starts when heat leaves the house, reaches the attic, and warms the roof unevenly.
Utah makes this more frustrating because we get the exact mix that feeds ice dams: heavy snow, cold nights, sunny winter days, and repeated freeze-thaw swings. If you only treat the ice you can see, you usually end up dealing with the same problem again after the next storm.
Understanding and Spotting Ice Dam Risks on Your Utah Roof
An ice dam is a ridge of ice that forms at the roof edge and traps melting water behind it. That backed-up water can work under shingles and show up where you don't want it: soffits, exterior walls, insulation, ceilings, and around light fixtures.
The key point is simple. Most ice dams are attic temperature problems wearing a roofing disguise.
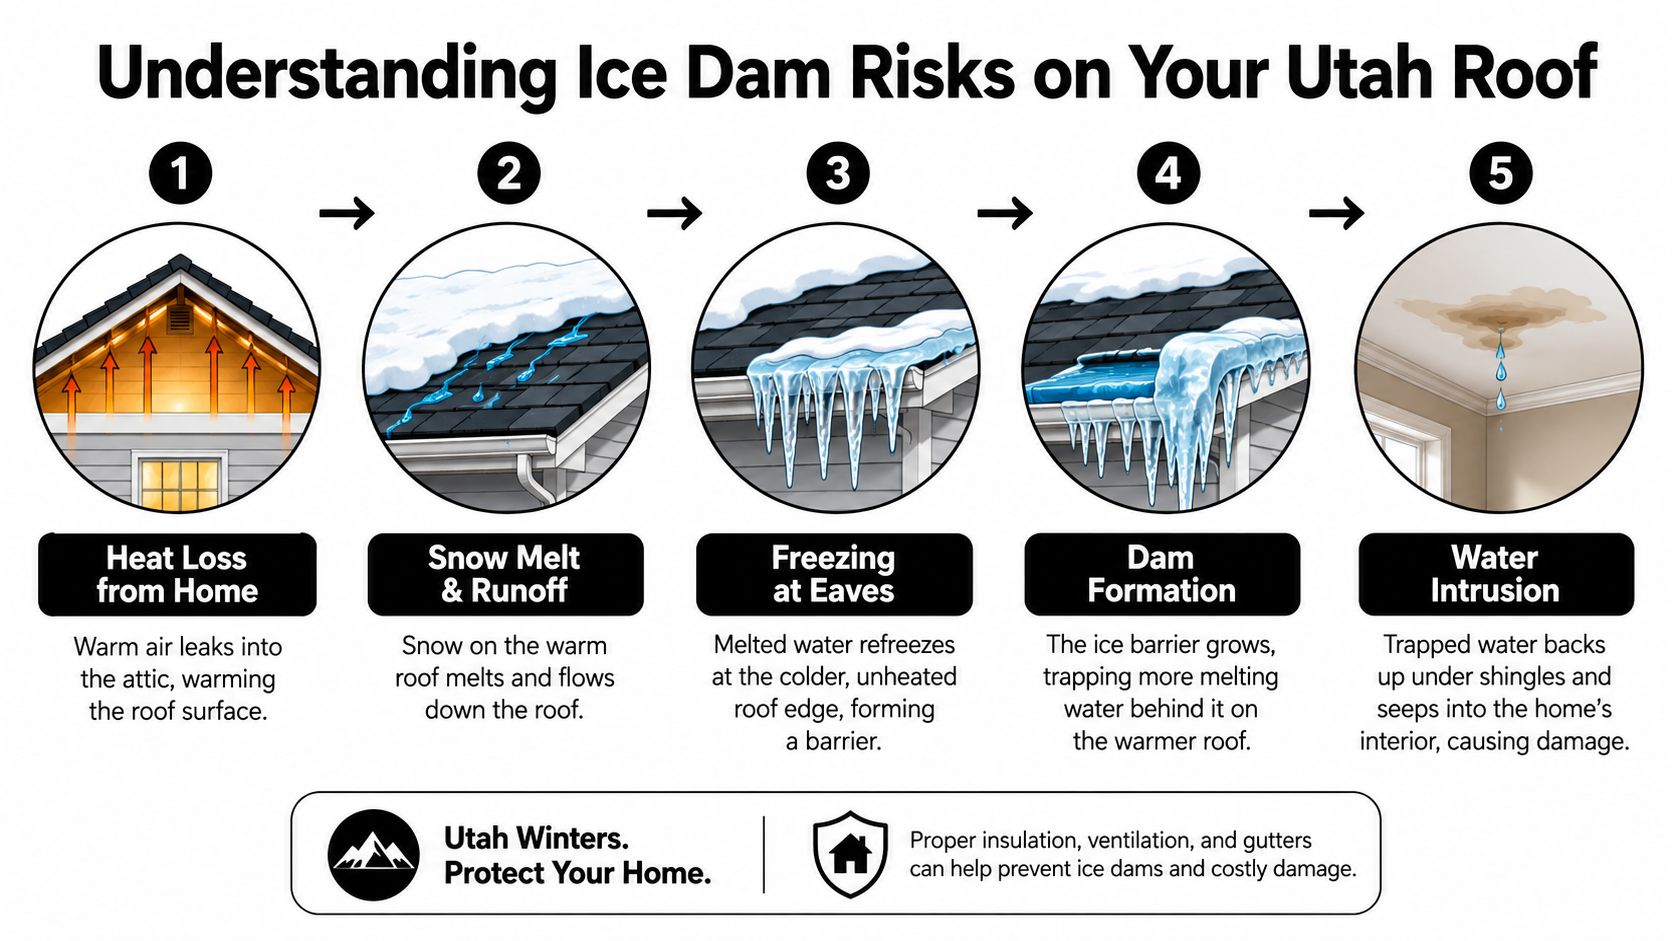
What the warning signs usually look like
Outside, the first clues are rarely subtle if you know what to watch for.
- Icicles concentrated in one area: If one eave line has much heavier icicles than the rest, that often points to a localized heat-loss issue above it.
- Ice tucked under the roof edge: Ice visible behind the gutter line or under the soffit is a bad sign because it suggests water is backing up instead of draining off.
- Patchy snow melt: If one section of roof clears faster while other areas stay snow-covered, the roof surface probably isn't staying evenly cold.
- Recurring trouble spots: Valleys, dormers, and roof transitions tend to show symptoms first because runoff collects there.
Inside the house, look for quieter clues:
- Ceiling stains near exterior walls
- Damp insulation in the attic
- Frost or moisture around attic penetrations
- Paint bubbling where the wall meets the ceiling
Ice at the eaves is the visible part. The expensive part is the water that starts moving where you can't see it.
The myth that confuses a lot of homeowners
A lot of people assume a new roof with ice and water shield will prevent dams from forming. It won't. As explained in this breakdown of what ice and water shield actually does, these membranes don't stop ice dams from forming. They help control leakage if a dam forms.
That distinction matters. If a contractor talks like underlayment alone solves the problem, that's a red flag. Underlayment is a backup layer. It's not the main fix for an ice dam prevention roof strategy.
Why Utah roofs see this so often
Utah homes deal with sharp overnight freezes and daytime warming. Snow melts on the warmer part of the roof, runs downhill, then refreezes at the colder eaves. Once that ridge forms, every new melt cycle feeds it.
In practice, the roof edge usually isn't the source. The source is warm air escaping through attic bypasses, weak insulation coverage, blocked vent paths, or some combination of all three.
Immediate Mitigation Tactics for Active Ice Dams
You wake up after a Utah storm, see a thick ridge of ice along the eaves, and then notice a brown spot spreading on the ceiling by lunch. At that point, the job is simple. Slow the water down, protect the inside of the house, and avoid turning a roof problem into a fall injury.
Stay off the roof. Snow-covered edges, frozen ladders, and slick shingles put homeowners in the ER every winter. An active ice dam is a repair problem. A fall is a trauma problem.
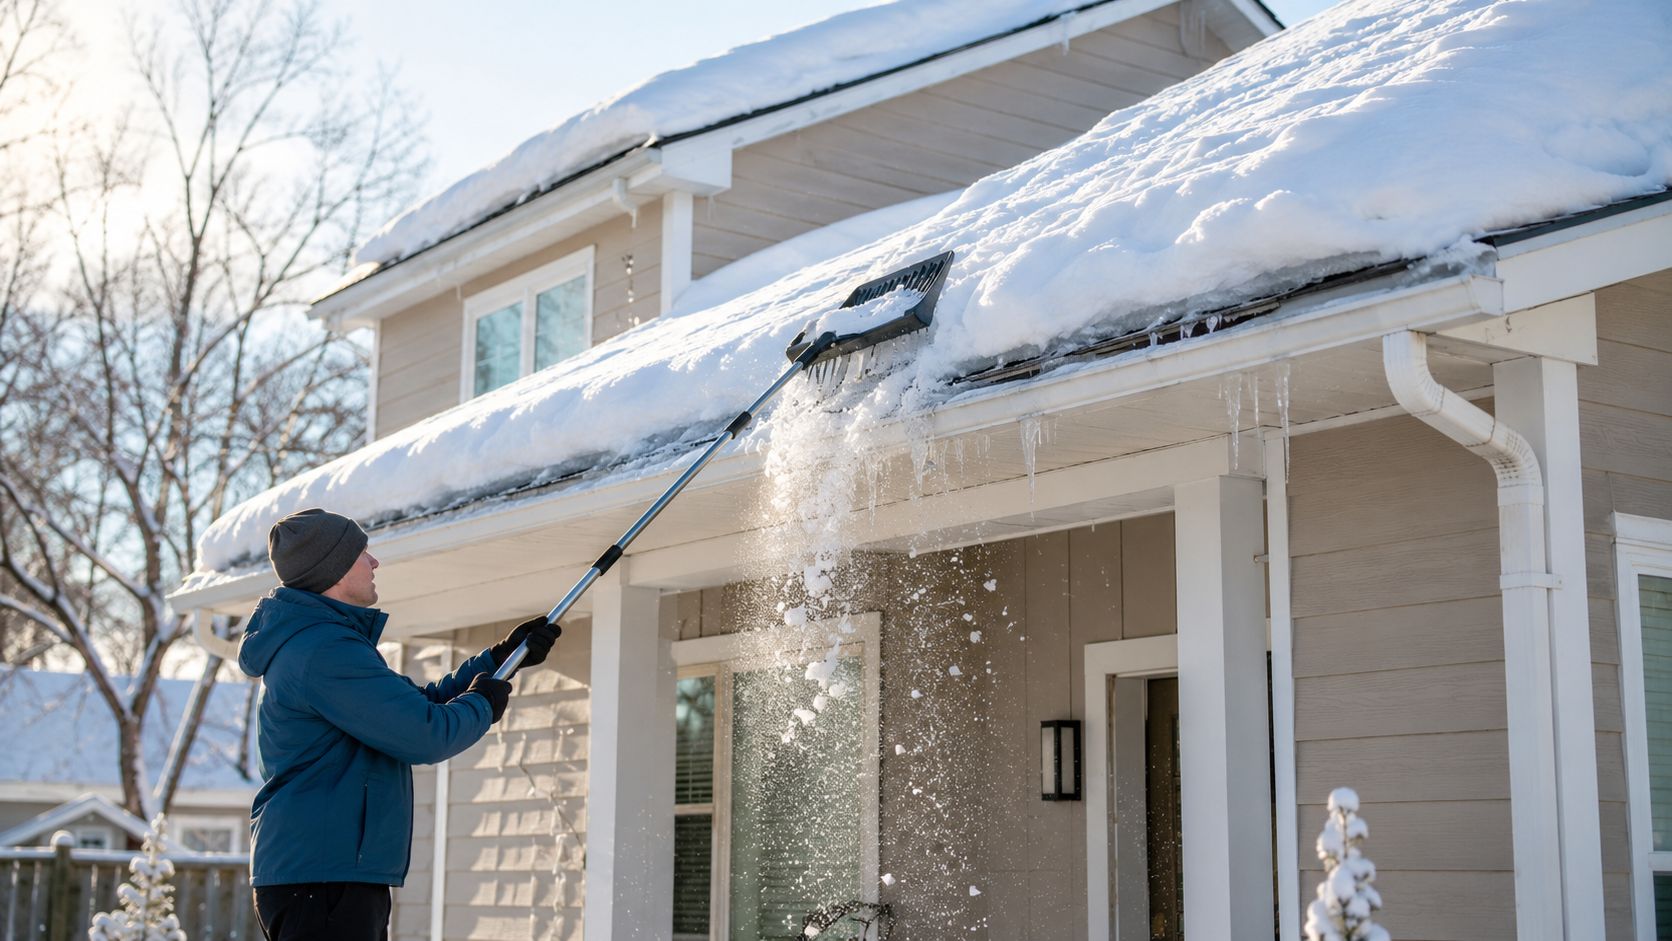
What you can do safely from the ground
A long-handled roof rake is still the best first move for many Utah homes, especially after our lighter dry snow gets followed by a sunny afternoon and a hard freeze at night. Pull snow down from the roof edge in shallow passes. Leave a thin layer behind so you are not grinding the rake into shingles or exposed fasteners.
The goal is to reduce the snowpack feeding the dam, not to make the roof look clean.
Partial removal needs some judgment. If you only clear a narrow strip at the eaves and leave a thick band of snow above it, meltwater can refreeze higher up the roof. The safer approach is to rake a consistent section from the edge upward as far as you can reach from the ground without forcing the tool.
If warm air loss is part of the problem, the long-term payoff comes from fixing the house, not just the ice. This is one reason many homeowners save money by sealing your home before next winter instead of paying for the same emergency twice.
What not to do
Homeowners usually cause damage in a hurry when they get aggressive with the ice.
- Don't chop at the dam with tools. Hammers, flat bars, axes, and hatchets break shingles, dent drip edge, and damage flashing.
- Don't dump rock salt on the roof. It can stain, corrode, and shorten the life of nearby metal components.
- Don't set a ladder on frozen or uneven ground. A one-minute climb to “just knock off that edge” goes bad fast.
- Don't use a torch or open flame. That can damage the roof assembly and create a fire risk.
Field rule: If the method depends on standing on ice and swinging a tool, it is not a homeowner method.
Temporary melt channels and when to call for help
For a minor active leak, a calcium chloride ice melt product placed in a fabric sock can open a narrow drainage channel through the dam. The Minnesota Department of Commerce notes that calcium chloride can help melt a path for trapped water, while warning against chipping ice away with tools or using rock salt on the roof in its guidance on preventing and removing ice dams. It is a short-term measure, but sometimes that short-term measure keeps water out of drywall and insulation until conditions are safe for better work.
Steam removal is the cleaner option when the dam is thick, the leak is active, or the roof is steep. Professional steaming removes ice with much less risk to shingles than mechanical chopping. It also makes more sense on Utah roofs with valleys, lower-pitch sections, or repeated freeze-thaw exposure where the ice bonds hard to the surface.
Heat cable has a place, but it is easy to misuse. On a problem area such as a valley over a heated room, a properly laid cable can maintain a drainage path. Random zig-zag cable at the eaves usually tells me the house still has an attic heat-loss problem that was never corrected.
The Permanent Fix The Pros Use Attic Insulation and Ventilation
If you want an ice dam prevention roof plan that lasts longer than one storm cycle, focus on the attic. The goal is building a cold roof. That means the roof deck stays close to outdoor temperature so snow doesn't melt unevenly from below.
In northern climates like Utah, preventing ice dams requires attic insulation with a minimum R-value of 38 and a ventilation ratio of at least one square foot of opening for every 300 square feet of attic floor, using both ridge and soffit vents to help keep attic air close to outdoor conditions, according to Allstate's guidance on icicles and ice dams.
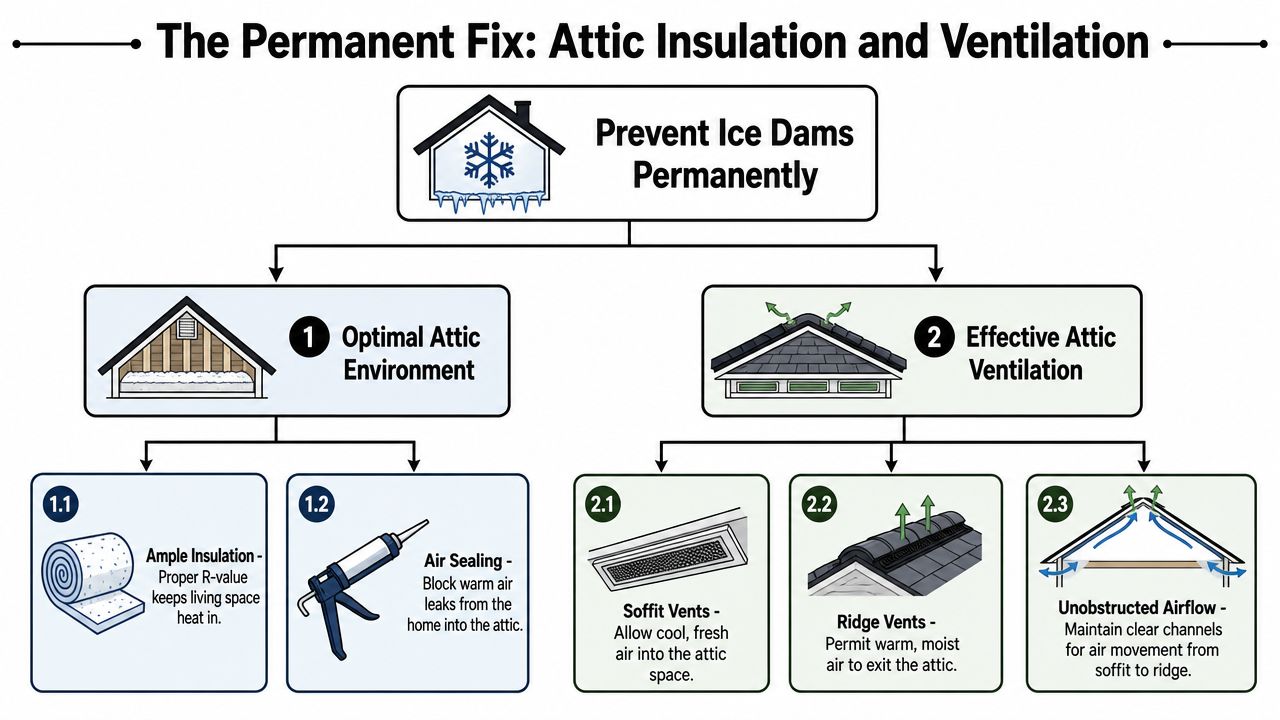
Air sealing comes before more insulation
A lot of Utah homeowners think, “I'll just add more insulation.” Sometimes that helps. Sometimes it barely changes the outcome because warm air is still leaking around penetrations.
Common trouble spots include:
- Attic hatches and pull-down stairs
- Can lights and ceiling fixtures
- Plumbing and vent penetrations
- Chimney and flue chases
- Top plates over interior walls
If warm interior air keeps reaching the attic, even decent insulation can be undermined. Before adding material, it helps to understand where the house is leaking. This guide on how to save money by sealing your home gives homeowners a practical overview of what to look for.
Ventilation has to be continuous, not random
Good attic ventilation isn't just “some vents up there.” It's an intake-and-exhaust system. Cool air needs to enter at the soffits and move upward to exhaust at the ridge.
Problems show up when that path is broken:
- Soffit vents are buried by insulation
- No baffles or air chutes keep the path open
- A house has gable vents but weak low intake
- The ridge vent exists, but intake air can't reach it
That's why adding a vent product by itself often disappoints people. Ventilation only works when air can travel the full path.
Here's a useful visual explanation of how the whole system works in practice:
What a proper permanent fix usually includes
The most reliable approach is layered and boring in the best way.
- Seal attic air leaks first. Stop interior heat from escaping into the attic.
- Bring insulation up to the right level. In Utah, that means treating R-38 as the floor, not the target to undershoot.
- Maintain open soffit-to-ridge airflow. Use baffles so insulation doesn't choke off intake.
- Check the whole attic, not one corner. Ice dams often come from a collection of smaller defects rather than one dramatic failure.
A roof that stays uniformly cold performs better in winter than a roof that gets “help” only at the edge.
This is the heart of a real ice dam prevention roof system. The cleaner the attic thermal boundary, the less work the roof edge has to do.
Choosing the Right Roof System and Underlayment for Utah Winters
Roofing material matters, but not in the way most ads suggest. Homeowners often assume the product itself will solve ice dams. It usually won't.
The two biggest misconceptions I hear are these: metal roofs prevent ice dams and ice and water shield prevents ice dams. Both ideas leave out the most important part.
Metal helps, but it isn't magic
Metal roofing has a smoother surface than asphalt shingles, so snow and ice don't grip it the same way. That can reduce adhesion and improve shedding under the right conditions. But if heat from the house is melting snow from below, metal can still end up with ice collecting at the eaves.
As noted in this discussion of ice dam prevention on metal and other roofs, metal roofs don't prevent formation if attic heat melts snow, and they still need proper insulation and soffit-to-ridge ventilation. That's especially true on Utah homes with dormers, valleys, and complex roof geometry where snow movement gets unpredictable.
What the underlayment is actually for
The underlayment question is simpler. Building codes in the U.S. and Canada require a polymer-modified bitumen self-adhering underlayment that complies with ASTM D1970 or CSA A123.22 and extends a minimum of 24 inches inside the interior wall line, according to the Asphalt Roofing Manufacturers Association's guidance on preventing damage from ice dams.
That layer is a leakage barrier. It's there because even a well-built roof can face ice backup during heavy snow events. It protects the deck and the interior if water gets pushed where normal drainage wasn't intended to handle it.
What to ask a roofer before signing
If you're replacing a roof in Utah, ask direct questions.
- What underlayment are you using at the eaves? Ask whether it's a self-adhering polymer-modified bitumen product that meets the required standard.
- How far will it extend? You want the answer tied to the interior wall line, not vague talk about “a couple courses.”
- Are you evaluating attic conditions too? A roofer who ignores insulation, ventilation, and air leakage is only addressing part of the problem.
- How will you document the inspection? If you want a good checklist for contractor screening, this outside resource offers useful advice for homeowners vetting roof inspectors.
A quality roof system in Utah should be treated as defense in depth. The attic handles prevention. The underlayment handles backup protection. The roof covering handles weather exposure. If one contractor acts like only one layer matters, keep looking.
Comparing Ice Dam Prevention Costs and ROI
A Utah homeowner usually hits the same wall by midwinter. One contractor says to install heat cable. Another says to add insulation. A third says the roof itself is the problem. The right answer depends on whether you are paying to manage this winter or to stop the cycle for the next ten.
In our climate, that distinction matters. Heavy snow loads, low humidity, and repeated freeze-thaw swings punish half-measures. A cheap fix that gets you through one storm can still be the expensive choice if you are paying for drywall repair, insulation replacement, and another emergency visit next January.
Ice Dam Prevention Method Comparison
| Method | Initial Cost | Effectiveness | Best For |
|---|---|---|---|
| Roof rake snow removal | Low | Temporary and weather-dependent | Homeowners dealing with fresh snow who can work safely from the ground |
| Calcium chloride melt channels | Low | Temporary leak relief only | Small active trouble spots while arranging a permanent repair |
| Heat cable on problem areas | Moderate | Better as symptom control than root-cause prevention | Localized drainage support where redesign or attic work isn't immediate |
| Attic air sealing | Moderate | Strong long-term value when heat loss is the driver | Homes with obvious bypasses, uneven melt, or chronic repeat dams |
| Insulation upgrade | Moderate to high | Best when paired with air sealing and ventilation | Older homes or attics with thin, uneven, or settled insulation |
| Soffit and ridge ventilation corrections | Moderate to high | High value when airflow paths are blocked or incomplete | Homes with blocked soffits, missing baffles, or weak intake/exhaust balance |
| Full layered approach | Highest upfront | Most complete long-term strategy | Homeowners who want to reduce repeat failures and interior risk |
The best return usually comes from work homeowners never see from the street. Air sealing attic bypasses, bringing insulation up to a Utah-appropriate level, and fixing intake and exhaust airflow cost more upfront than a bag of melt tablets or a short run of cable. They also address the reason the roof edge is warming in the first place.
That matters more on older Wasatch Front homes, mountain properties, and houses with complex rooflines. I have seen plenty of roofs where the shingles were fine, but the attic floor leaked heat around can lights, plumbing penetrations, top plates, and access hatches. The owner kept paying for snow removal because the roof system was reacting to house heat, not failing on its own.
Heat cable still has a place. It can help on a stubborn valley, over a cold-entry section, or on a roof where a full attic correction is not realistic yet. It is usually a control measure, not the main fix. If someone sells it as a permanent answer without talking about insulation depth, air leakage, and vent paths, that is a red flag.
Utah-specific insulation targets also change the math. A home with patchy attic insulation well below current best practice will usually get more long-term value from sealing and adding insulation than from repeated winter service calls. The payoff is not just fewer ice dams. You also reduce heat loss, improve comfort, and put less strain on the roof during freeze-thaw weeks.
The return shows up in avoided damage. Fewer emergency de-icing visits. Less chance of soaked insulation at the eaves. Less repainting, drywall patching, trim damage, and hidden moisture in exterior wall cavities.
If you already have interior staining or active leakage, document everything before cleanup and read this article with expert advice on ice dam claims. It gives homeowners a practical overview of what insurers may look for and how to organize the claim side before details get missed.
Your Year-Round Ice Dam Prevention Maintenance Schedule
The best Utah homes don't wait for January to think about ice dams. They treat prevention as a maintenance cycle. That's how you catch blocked vents, thin insulation, and roof-edge issues before snow exposes them.
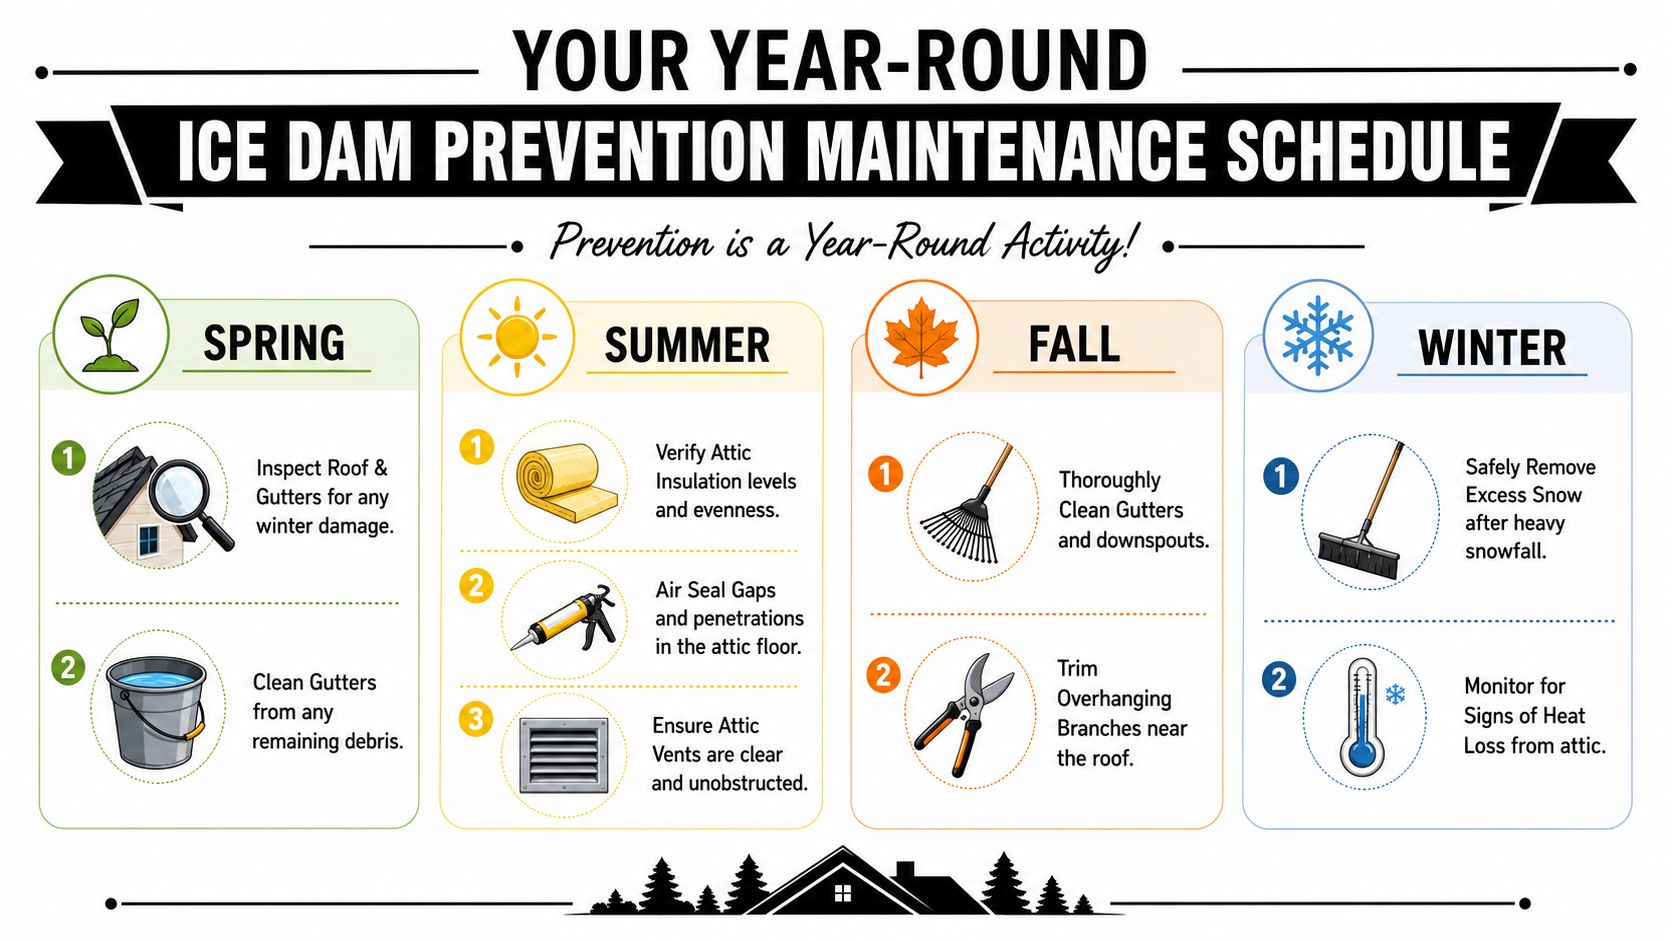
Spring and summer jobs that matter
Spring is cleanup and inspection season. Once snow is gone, check the roof edge, flashing zones, soffits, and gutters for signs that winter forced water where it didn't belong.
Use spring to look for:
- Lifted or damaged shingles near the eaves
- Gutter strain or loose fasteners
- Water stains in attic corners or on the top side of ceiling drywall
- Wet or compacted insulation
Summer is the best time to handle corrective work because you can see and access the attic conditions clearly.
A practical summer checklist:
- Seal attic bypasses. Focus on penetrations, hatches, and visible leakage points.
- Even out insulation coverage. Low spots matter.
- Confirm soffit intake is open. Insulation should not block the vent path.
- Inspect baffles and ridge exhaust. Airflow needs a full route, not partial openings.
Fall prep before the first serious storm
Fall is where a lot of preventable winter problems get set in motion. Gutters fill, downspouts clog, and leaves or debris start trapping moisture near the roof edge.
Handle these jobs before snow season:
- Clean gutters and downspouts thoroughly
- Trim overhanging branches that dump debris on the roof
- Check attic access weatherstripping
- Look for new penetrations from other trades such as bath fans, wiring, or vent work that may have disturbed the attic air barrier
If you've had recurring trouble in one area, mark it now. That way you can monitor the exact spot after the first major snow.
Winter response without making things worse
Winter maintenance is mostly observation and safe snow management. Don't wait until water shows up indoors to start paying attention.
Watch for:
- Fast melt patterns over one room or roof section
- Heavy icicles in a concentrated line
- Ice at valleys or transitions
- Attic warmth that feels noticeably above outdoor conditions
If snow piles up after a major storm, use a roof rake from the ground if conditions allow. If you can't remove snow safely, don't force it. Temporary measures have their place, but once the same area keeps failing, the house is asking for a better attic solution.
When the same eave dams up every winter, the pattern is the diagnosis.
When it's time to call a pro
DIY makes sense for monitoring, light maintenance, and safe ground-level snow removal. It stops making sense when the fix involves building science, roof assembly details, or unsafe access.
Call for professional help if:
- You've had repeat leaks in the same area
- You suspect major attic air leakage
- Ventilation needs to be added or redesigned
- You're replacing roofing and want eave protection detailed correctly
- There are signs of structural moisture, mold, or damaged roof decking
A good contractor should be able to explain the whole chain clearly: where heat is escaping, how the attic is performing, what the roof assembly is doing, and which steps will reduce future risk.
If you want a second set of eyes on recurring ice dam issues, Superior Home Improvement can help evaluate the roof system and the energy-loss conditions feeding the problem. For Utah homeowners, the right answer usually isn't a single product. It's a coordinated fix that improves attic performance, protects the roof edge, and holds up through real winter weather.