
You've chosen the replacement patio door, checked the style, and may even have an installer ready. Then the old frame comes out and the opening tells a different story. The jambs aren't parallel, the sill slopes, and the dimensions don't match the nominal size printed on the old unit.
That's why learning how to measure patio door replacement openings requires more than recording one width and one height. A reliable measurement package includes the rough opening, jamb depth, diagonals, sill condition, and door handing. The extra checks take little time, but they give the installer information needed to order, prepare, shim, and seal the new unit correctly.
Why Accurate Patio Door Measurements Matter
A patio door can look like a simple rectangle, but the opening behind it rarely behaves like one. Framing settles, jambs bow, and previous repairs can leave layers of trim or shims that conceal the actual structure. A replacement unit ordered from one convenient measurement may fit on paper and still bind at the threshold or leave uneven gaps at the head jamb.
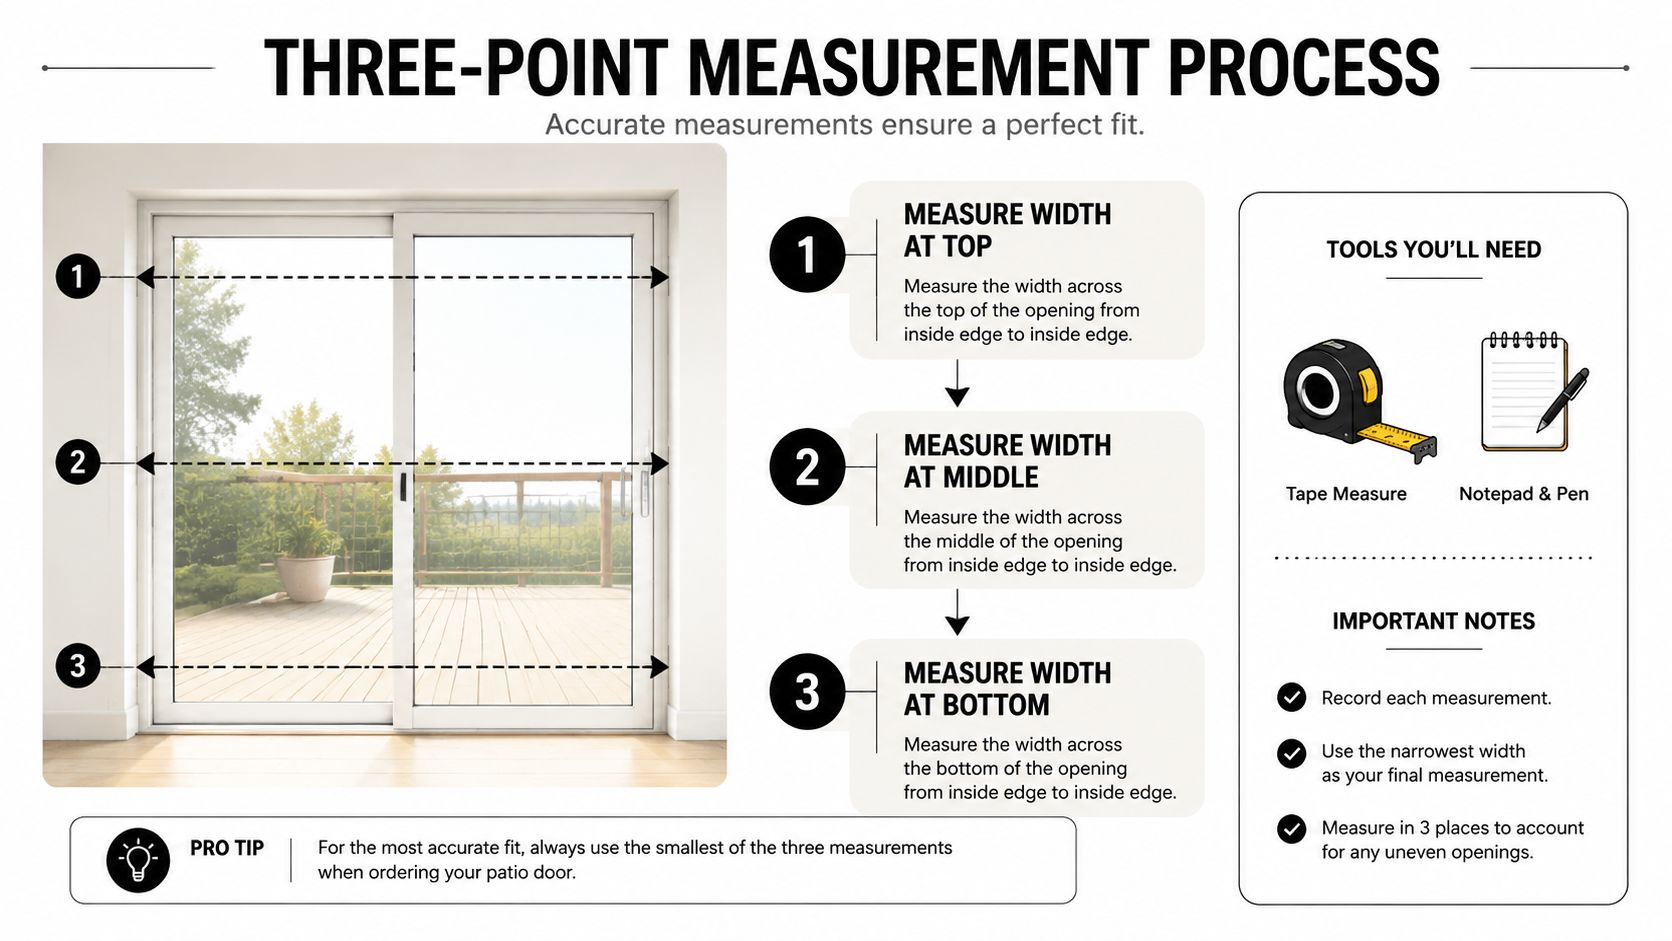
Industry measuring guidance recommends checking width at the top, middle, and bottom, then using the smallest reading. The same method applies to height, measured at the left, center, and right. These checks matter because openings are rarely perfectly square, and a small error can affect installation clearance, weather sealing, and long-term operation. Window World Chattanooga's patio-door measuring guide also recommends checking diagonals and jamb depth rather than relying on width and height alone.
Practical rule: Measure the opening the new frame must occupy, not the door you're removing.
The consequences of a poor measurement extend beyond an inconvenient return. A unit that's too large can't be set without altering the framing. One that's too small may require excessive shimming, leaving weak fastening points and difficult weatherproofing. A twisted opening can make a sliding panel drag or prevent French-door leaves from meeting evenly.
Standard dimensions can provide a useful sanity check, but they aren't a substitute for field measurements. Modern patio doors commonly use an 80-inch height, with frequently produced widths of 60 inches, 72 inches, and 96 inches, while larger multi-panel systems extend farther. Pella's measuring guidance identifies 72 by 80 inches as a common patio-door size and still emphasizes measuring the opening itself.
Tools and Preparation Before You Start Measuring
Start with a steel tape measure, preferably one long enough to cross the entire opening without stretching or joining measurements. Add a level, a carpenter's square, a notepad or phone, a pencil, and a step ladder for the head jamb. A phone camera is useful for recording conditions that numbers won't describe, such as staining, cracked sealant, or an uneven threshold.
If this is a full-frame replacement, remove the interior casing before taking final measurements. Trim-to-trim dimensions describe the finished opening, not the rough opening behind the old door. Carefully cut through paint or caulk at the trim edge, then pry the casing away without damaging the surrounding wall. The replacement frame will be installed after the existing unit is removed, so the installer needs the framing dimensions rather than the old unit's nominal size.
Before measuring, inspect the exposed opening:
- Check the sill: Look for rot, softness, staining, insect damage, or signs that water has entered below the door.
- Inspect the side framing: Settled or damaged jack studs can change the width and may need repair before installation.
- Identify the wall construction: Wood framing, masonry, and concrete block can require different fastening methods and affect frame-depth decisions.
- Clear the work area: Move rugs, furniture, shades, and other obstructions so the tape and level can sit correctly.
Industry guides recommend measuring width at three locations and height at three locations, recording each reading before selecting the smallest value. The three-point process is simple, but skipping it is one of the easiest ways to miss a bowed jamb or uneven header.
Use the same preparation standard whether you're measuring for an estimate or preparing to order. If the sill is damaged or the framing is visibly distorted, document it and involve the installer before treating the measurements as final.
Measuring Width Height and Depth of the Rough Opening
The rough opening is the structural space that remains after the existing door and frame are removed. For a full-frame replacement, that's the measurement that controls the new unit. Measuring the existing panel or finished trim can produce a neat number that has little value for ordering.
Width
Measure horizontally between the side jambs at three points:
- Near the top, below the header.
- Through the middle of the opening.
- Near the bottom, above the sill.
Write down all three readings. Use the smallest width as the controlling measurement because the new frame must pass through the narrowest point. Don't average the readings. An average can hide the exact location where the frame will bind.
Height
Measure vertically from the actual sill or subfloor to the underside of the header. Take readings at the left side, center, and right side. Again, retain the smallest height.
Be precise about the bottom reference. If the old door sits on a threshold, identify the surface that will support the replacement unit. If flooring, tile, or a transition strip changes the finished elevation, note that condition separately rather than allowing it to distort the structural opening measurement.
Jamb depth
Jamb depth describes the wall thickness the replacement frame must accommodate. Measure from the finished interior wall surface toward the exterior wall surface, checking more than one point along the jamb. Depending on the wall assembly, the measurement may include drywall, framing, sheathing, siding, stucco, or other finish layers.
A frame that's too shallow may leave an exposed gap or require extension jambs. A frame that's too deep can project into the room or interfere with exterior trim. RELIABILT's measurement feature sheet highlights jamb depth, sill condition, and operating-panel orientation as details that basic width-and-height instructions often leave out.
Record the readings immediately, label each location, and photograph the tape in place when a dimension looks unusual. The installer can then distinguish a true opening condition from a recording mistake.
Checking Squareness Diagonals and Sill Condition
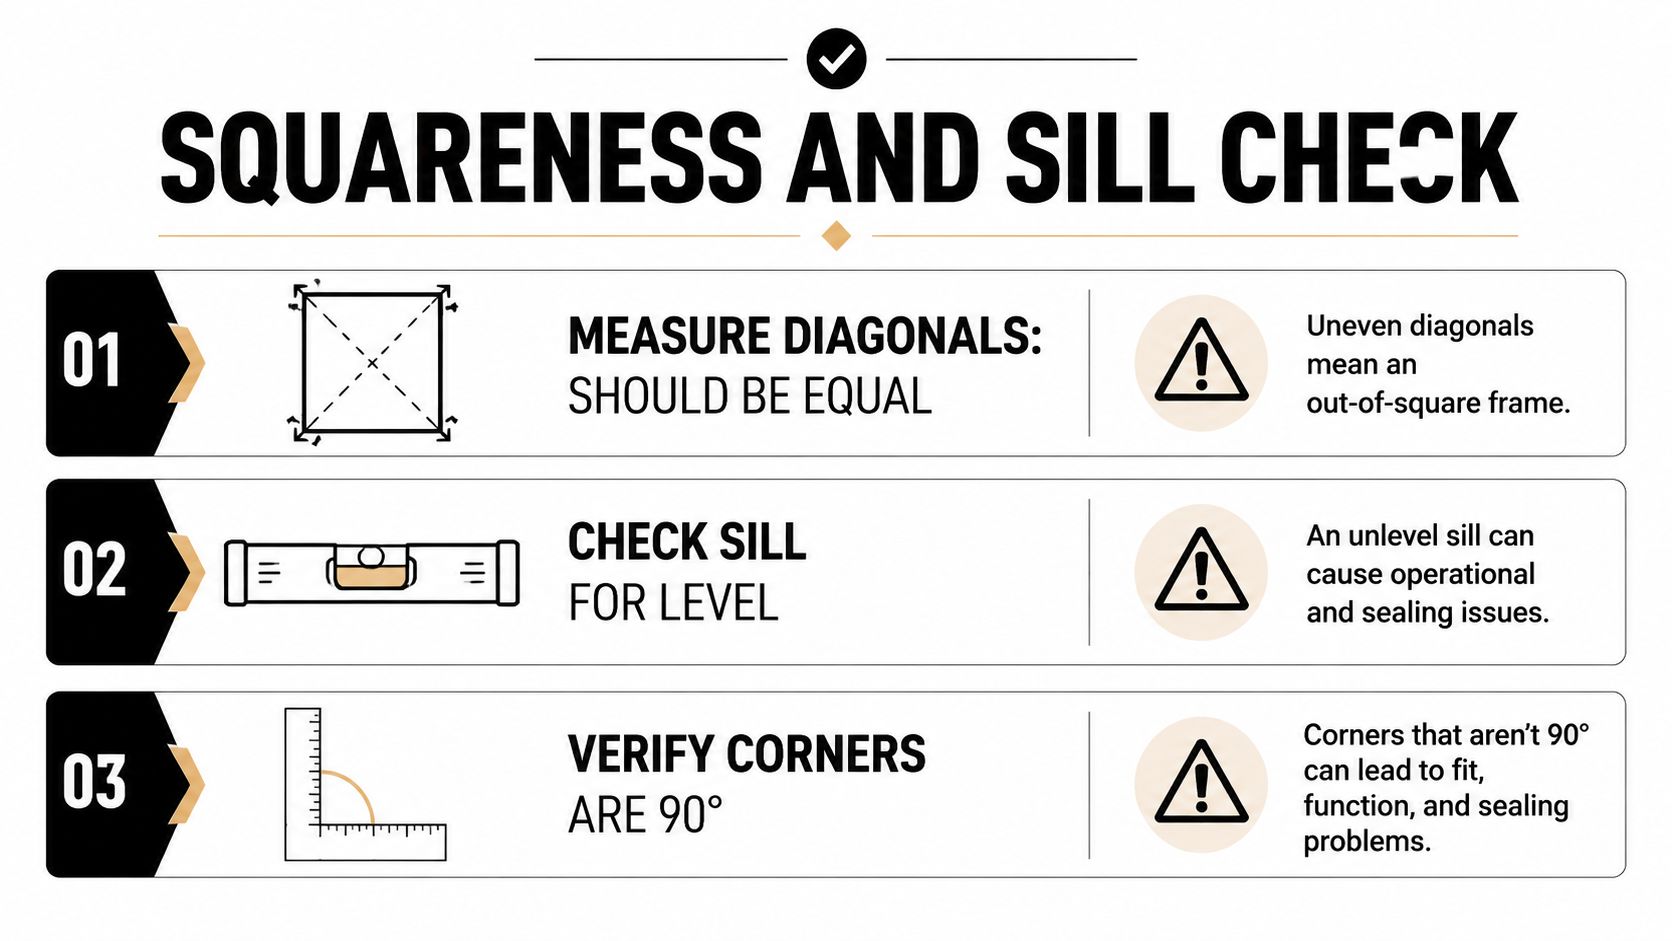
A replacement door can match the stated width and height yet still fail to fit cleanly if the opening is out of square. At the jobsite, diagonal checks, jamb alignment, and sill condition reveal problems that a basic size measurement misses.
Measure from the upper-left corner to the lower-right corner, then from the upper-right corner to the lower-left. Compare the readings. A measurable difference between the diagonals indicates that the opening is out of square and may require shimming or framing adjustment during installation. The Steel Door Institute's SDI-117 guidance addresses squareness as a separate fit condition from the opening's basic dimensions.
Record the mismatch on the measurement sheet and include it in the estimate. The installer may need to correct framing, plan the shim locations, or confirm that the selected replacement unit has enough adjustment range. A diagonal difference does not automatically stop the project, but ignoring it can leave the frame twisted, the panels difficult to operate, or the weather seals uneven.
Inspect the sill across the entire supporting surface. Place a level on the substrate, not only on a removable threshold cap. Check for dips, crowns, soft wood, failed sealant, and staining that points to repeated water exposure. Drainage and door operation both depend on a firm, properly prepared sill.
Check each side jamb for plumb with the level. Where access allows, place a square at the corners to identify gaps or lean. If the sill slopes or a jamb is out of plumb, record the condition instead of altering the stated opening height to make the numbers appear cleaner. Note the affected location and photograph unusual conditions for the installer.
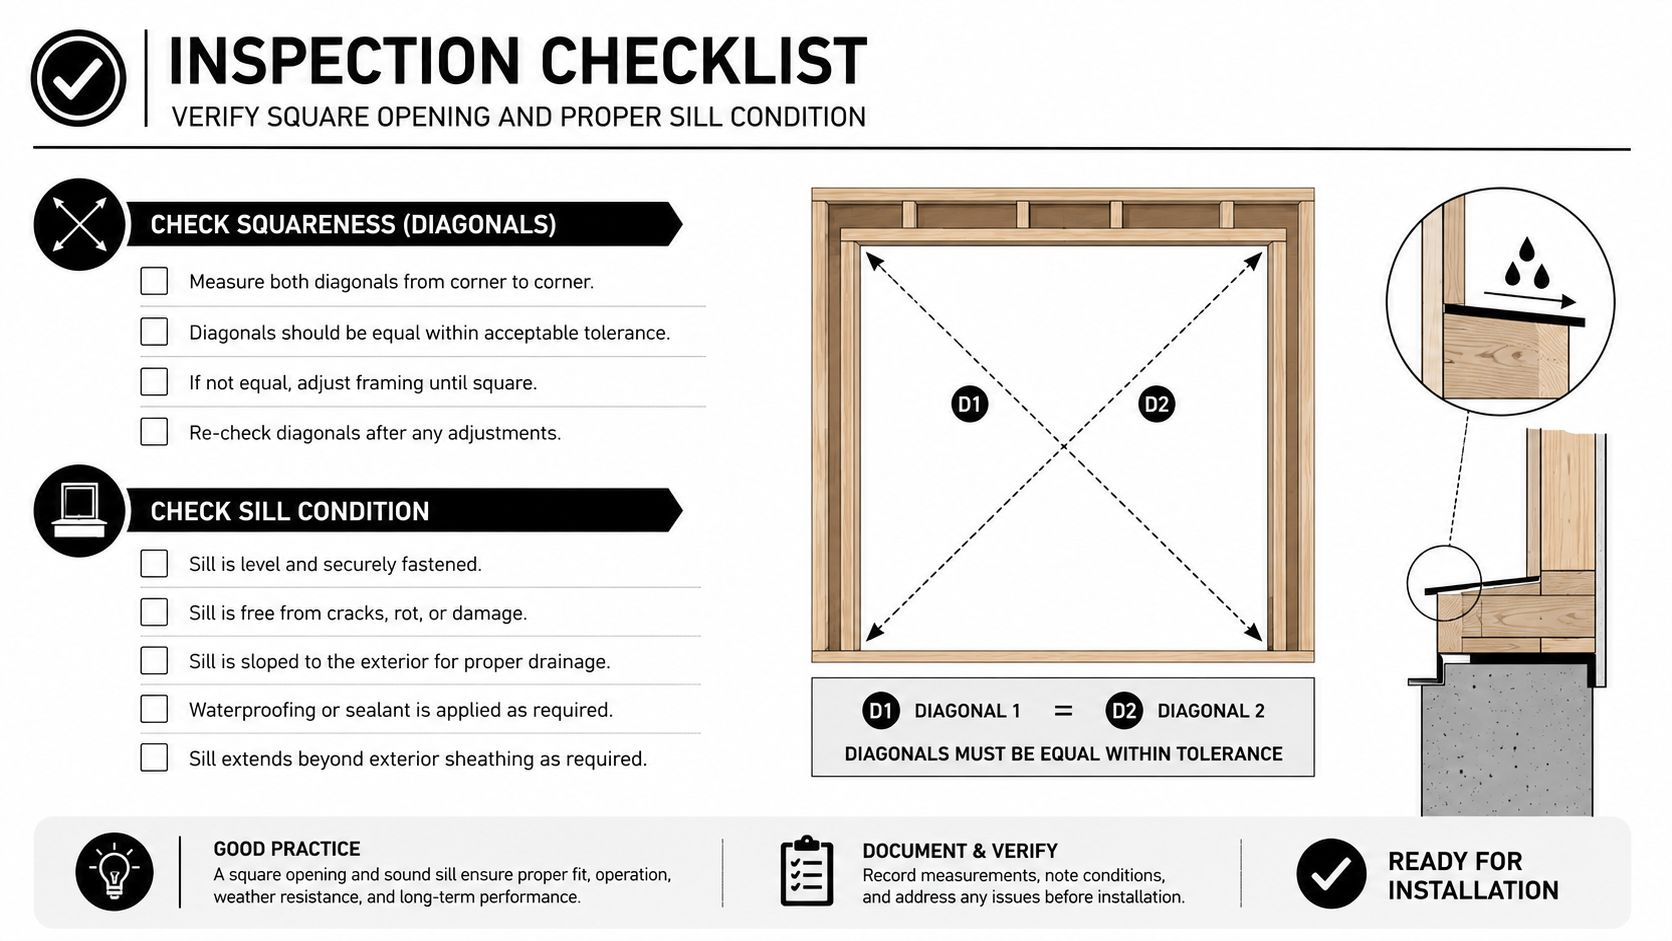
A clean measurement sheet records the opening's dimensions, alignment, sill condition, and any preparation required before installation.
Measurement Differences by Patio Door Type
The rough-opening process stays consistent, but the information required by the product changes with the configuration. A sliding door, French door, and multi-panel system may occupy a similar opening while demanding very different details from the homeowner and installer.
| Door Type | Critical Measurements | Unique Considerations |
|---|---|---|
| Sliding patio door | Rough-opening width and height, jamb depth, sill condition, track area, active-panel direction | Confirm which panel operates, where it travels, and whether the existing track or frame is being removed |
| French patio door | Rough-opening width and height, jamb depth, sill level, center meeting point, handing, swing clearance | Identify the active and inactive leaves and verify that furniture, walls, exterior steps, or landscaping won't block the swing |
| Multi-panel or bi-fold system | Full rough-opening span, height, jamb depth, sill condition, stacking area, header condition | Confirm where panels collect, whether there's enough pocket depth, and whether the opening can support the selected configuration |
Sliding doors
For a slider, the active panel's travel direction matters. Stand inside the home and record whether the operating panel moves toward the left or right as you face the exterior. Don't rely on a salesperson's shorthand without confirming how that manufacturer defines handing.
Also note the sill and track condition. A worn track may disappear with a full-frame replacement, but an insert replacement may retain the existing frame and require measurements of the current unit rather than the rough opening. Confirm the replacement method before ordering.
French doors
French units need a clear record of the active leaf, inactive leaf, hinge side, and swing direction. The center meeting area must align correctly, and the sill must support the leaves without forcing one panel higher than the other. Measure the interior and exterior swing zones for obstructions, including walls, cabinets, furniture, railings, and nearby landscaping.
Multi-panel systems
Large openings need more than a span measurement. Record where panels will stack, how much wall or pocket space is available, and whether the header appears adequate and undisturbed. A wide system may require structural review before a product is selected, especially if the existing opening has been altered.
Common Measurement Mistakes and How to Avoid Them
A replacement can fit the opening and still fail at installation because the measurement package omitted how the existing door is built. The costly mistakes usually happen when the replacement method, wall finish, or site condition is left unclear.
Assuming insert and full-frame replacements use the same reference: An insert replacement may retain the existing frame, sill, and trim. A full-frame unit may expose the rough opening and change the dimensions that matter. Confirm the planned method before deciding which surfaces to measure or remove.
Measuring only after removing every finish: Interior casing may hide the opening, but removing trim can damage paint, drywall, or adjacent finishes. Record the visible conditions first, then identify which trim must come off for a final field measurement. An installer needs to know whether the stated size reflects the finished opening or an exposed rough opening.
Recording numbers without their locations: A loose list of measurements leaves no way to tell which reading came from the top, bottom, interior, or exterior. Label each value on a sketch, include the reference surface, and mark unusual conditions beside the measurement. This prevents a correct number from being applied to the wrong part of the door.
Failing to document existing alterations: Patched framing, added shims, blocked drainage paths, and nonstandard trim can affect the replacement even when the opening appears ordinary. Note anything that differs from a typical installation, including signs that the door was resized or reframed.
Skipping photographs for difficult conditions: Written dimensions cannot show a crushed corner, deteriorated sill, concealed flashing, or an obstruction close to the frame. Photograph both sides of the opening, then add close-ups of questionable areas. Photos support the measurements and let the installer identify conditions that may require a site visit.
Rounding away a problem: Keep the actual tape reading when one value differs from the others. A short note explaining the location is more useful than a neat average that hides a bowed jamb or altered framing.
Use the measurement guidance from Window World Heartland's replacement measuring guidance as a cross-check, not as a substitute for documenting the opening's condition. A complete record gives the installer enough information to distinguish a product-size question from a framing or installation issue.
Preparing Your Measurements for Installers and Estimates
A contractor can work from a clean measurement package. A loose collection of numbers in a text message creates questions, delays, and opportunities for the wrong dimension to become the order basis.
Create one summary sheet for each opening. Include:
- Width at the top, middle, and bottom, plus the smallest width.
- Height at the left, center, and right, plus the smallest height.
- Jamb-depth readings and the wall-finish conditions used as reference points.
- Both diagonal measurements and any difference between them.
- Sill-level observations, damage, rot, staining, or drainage concerns.
- Door type, active panel or leaf, handing, and intended swing or slide direction.
- Obstructions inside and outside the opening, including trim, outlets, switches, furniture, steps, or landscaping.
Take clear photos from both sides of the opening. Add close-ups of the sill, header, side jambs, corner conditions, and any previous alterations. Include a photo of unusual tape readings when possible, but don't use photographs as a substitute for written dimensions.
If you're comparing contractors, send every estimator the same package. That makes the bids easier to compare because each professional is responding to the same opening conditions. For complex openings or Sacramento-area projects, homeowners can also find a Sacramento door contractor to review the measurements and identify installation issues before a unit is ordered.
Superior Home Improvement helps homeowners select and install energy-efficient patio doors with careful jobsite measurements, detailed estimates, and certified installation. Visit Superior Home Improvement to request a consultation and have your opening evaluated before you commit to a replacement door.